Create a model
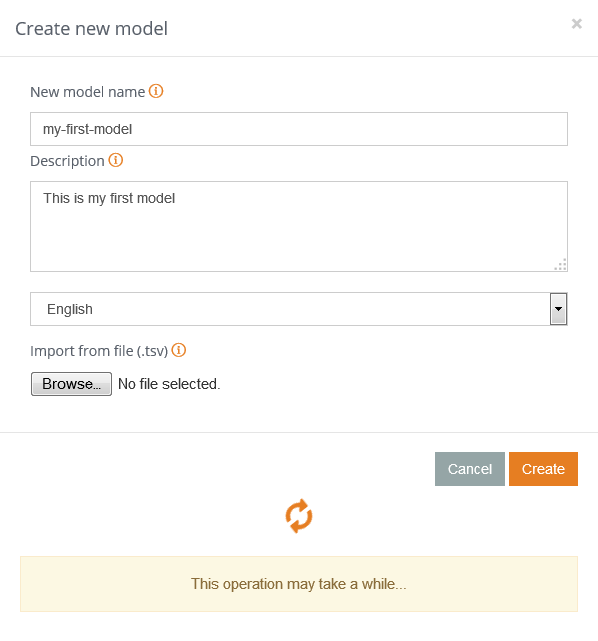
From this section you can create a model:

After selecting it, you will see four possible fields:
- New model name: the name of the model, how you will identify it, both in the dashboard and when used to classify texts. It's limited to 64 characters, and only dashes, underscores and alphanumeric characters are supported.
- Description: free text to describe the model. It is limited to 1024 characters.
- Language: language of the model. The language chosen affects only the list of stopwords that will be associated with the model. There are six predefined languages: Spanish, English, French, Italian, Portuguese and Catalan. If you have access to the Nordic pack, you can also create models in Danish, Swedish, Norwegian and Finnish.
- Import from file: allows to include a file containing categories in order to directly add them to the model you are creating. Read more details in the import section.
Out of these four fields, only New model name and Language are mandatory to create a new model.

Once you have filled in all the fields you need to create a model, you just have to click on "Create".
If any of the fields contains incorrect values, the creation process will be aborted and you will be redirected to the dashboard, where one or more error messages will explain what was wrong with the input data.
For example, if you enter "my first model" in the field New model name and you don't specify the language, you will obtain the following:

This only applies to the creation of a model and not to the import of categories.
When the creation process has been successfully completed (this includes the creation of categories from an imported file), you will be redirected to the model view.
This is how the dashboard looks like after creating a model:

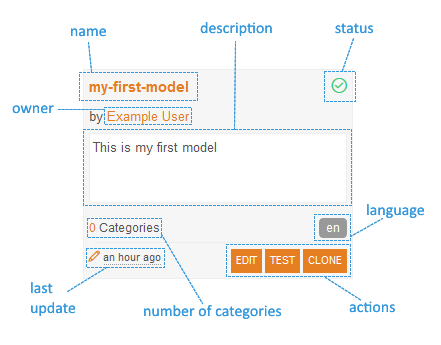
And these are the features displayed for each model created:

We have already talked about the name, the description and the language, which leaves the following fields:
- status: indicates if the last time the model was built the process ended successfully.
- owner: name of the user that created the model.
- number of categories: number of categories created in the model.
- last update: how long ago the model has been updated.
- actions: direct links to useful actions: model editing (also available by clicking the name), testing, and cloning.
Both the editing and the testing will be further explained in the model view section, as they can be accessed also from there. Nevertheless, the cloning operation can only be carried out from the models dashboard.
When you click on clone, you obtain the following dialog:

The cloning process makes an exact copy of the model you choose, including all its elements. The only things that change are the name and the description, both definable in the fields New model name and New description in the Clone model dialog.

Did you notice...?
That the models are ordered using the most recent first criterion? This way, you will always have at your fingertips the model you are currently working on.

